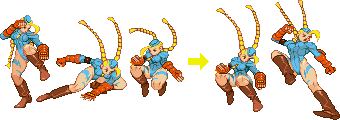
The cutting and pasting of different sprites to form a new pose is done for many reasons. When character creators want to give a character new moves, he or she may cut differing body parts and put them together to get the new pose that they want. For sprite editors, the character you're making may have a head like Ken, but a body and clothing style like Cody. For this, cutting and pasting comes in handy. Also, there are so many sprite edits out there that a new pose can hide the fact that it's a simple sprite edit and add to the illusion (and the dream) that your favorite company has made a game with this character in it.
 |
 |
That is an example of what can be done by cutting and pasting parts from a single character. Notice that I cut at the points where the body bends (joints) like shoulders, elbows, knees, neck, etc. If you cut in the middle of someone's limb, you must make sure that it's going in the same way or have good enough editing skills to make the entire limb look like it's going the right way.
Step-by-Step: New Captain America jumpkick
I did this with Paint Shop Pro 7, so the terminology that I use is from that program. Sure, some of you are using Photoshop, but I'm sure you can follow along with what I'm saying. I don't have another program that takes screenshots, so I can't show you snapshots of my working in PSP7. Once I do, I'll provide them to help with this tutorial.
Okay, lets say that you're working on a character based on Captain America's sprites. The character that you're working on is roughly the same size as Cap, but your character moves more like a stylish martial artist. The jumpkick looks a little too rigid, plus you don't want your character to look exactly like Captain America. Time to cut up some sprites.
![]()
I went through some of the spare Cap sprites I had ripped and picked some extra poses with more stylish upperbody poses. It'll take some work to get what I want, due to the how the upper body is bent.
![]()
Now, here's where the Paint Shop Pro 7 part comes in. I created a new image large enough to lay the sprites around. Then, I copied each pose and pasted them as separate layers. Just in case you mess them up, duplicate each frame. This way, if you realize that you want something that you deleted earlier during the editing, you can copy it from the original pasting. Now, line up the sprite layers they way that you want the pieces to be lined up and trim away what you don't need. After you get done, the first picture is what the parts would look like separately, while the second is what they would look like lined up .


Notice how there are some parts that really need to be cleaned up, including the head, left shoulder and the torso. Unless the character you're making has a giant Admiral Ackbar head, you don't want that giant noggin. And while you might be able to get away with those messed up stomach muscles, I don't think you want to be known as a lazy and sloppy spriter. If you're an artist, you probably know how to draw muscles and can do that little fix from memory. For non-artists, you should find some bodybuilding pics, muscle charts, GOOD comic book art or other such reference.

Now, the head and shoulder (I swear I didn't plan that one ahead of time) looks fine, but the stomach didn't come out as well as I wanted. The belt buckle looks normal though, and that was my main problem with it. As for the pose, that's pretty much it. Although I did this only for this tutorial, I like the way it came out. I might have to use this for an edit or something:)


Frankenspriting of multiple characters
| Here's where things get slightly tricky. When using parts from more than one character, make sure that they all fit right. Of course, if you know how to resize cut parts of characters, then it may not be much of an issue. That's a different subject, so I'll save that for a later tutorial. Make sure that the character parts that you're going to put together look good when assembled. Otherwise, you'll get horrible junk like what you see to your right... | |
| Two characters that are nearly the same height and build are Captain America and Magneto. Although they have similar bodies, the way that they fight are very different. Magneto floats and uses energy while Captain America is more of a hand-to-hand fighter. This would give you a wider variety of moves if you can frankensprite them correctly. |  |
| Basically, you follow the same instructions as you did before. The main difference will be that you will have to do much more clean-up work on the sprites because they're not from the same person and won't fit together as easily. Look at the side of the Magneto/Captain America hybrid. You can see that I had to fill in a few more pixels than I did when I was just editing Cap. |  |
| Here, have some more multi-character frankenspriting. | |
 | |
That's the basics. There are other things to learn that you'll figure out as you go along. Just practice, try new things and do your best. If you need sprite bases, take any of the ones that you saw in this feature and practice. You could probably make more poses that I didn't cut and paste together here. Return to top of the top of the page
